3-Gun Tactical Lever Action: Build Complete
- Oct 10, 2023
- 4 min read
Updated: Nov 19, 2023
The lever gat is finally ready for her debut!
This has been a refreshing deviation from the revolvers I've been building lately and took a little longer than most of my builds to complete. About 10 months instead of the usual 6. However, ~3 of those months were waiting on a replacement wood stock from Henry to be available.... So we'll say this build took a similar amount of time as my others.
While I waiting for another stock, I used the one I had to make a "Shorty" version of this tactical lever gat, for which I made a small fixed stock instead of an adjustable one. Below is a shot of this Shorty version. You can see more and the stock work at the Shorty Build Post Here.

That short stock is actually more like the one I envisioned when I first designed this project (as you can see in the design shot below) than the adjustable and recoil-buffering one that I've ended up adding to the "Full" version.

Finishing the Full Stock
Once I received the second wood stock, I got to work fitting the adjustment and recoil buffering mechanism that I'd started many months ago. This was tedious work, as I wanted to get the aluminum of the buffer system to follow the profile of the wood stock without removing the finish on the stock. Below are some pictures of that process.
I'd already sanded, painted, and drilled the SPS Adjustable Stock Base to the shape of the first stock, so I (sadly) had to ruin all that finishing work to make it fit this new stock.

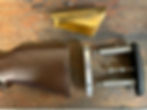
Below you can see the fit after some rough sanding. I put the tape on the stock to make sure I didn't ruin the finish too far from the adjustable stock base. I also used a little bit of Tight Bond mixed with saw dust from the stock as a filler to minimize the felt transition from wood to aluminum.

Here she is nearly complete with tape and excess wood glue filler removed.

An expanded view of all the stocks components, including the brass cheek rest that I made a few months ago (read about making that here).
Before the final attachment to the stock, I added a couple small pieces of brass on the stock-side of the aluminum base. These catch the nuts that control the stocks length of pull when the bolt they are attached to is turned.

I then mixed up some more Tight Bond and saw dust to serve as a bedding material for the adjustment mechanism.....

Secured it using the provided wood screws. All that was left was some final clean up, and then a cool fade paint job I had in mind.

Final Thoughts & Pics
This build have more deviations from the initial design sketch than others I've done. That was due to two main reasons:
First, I was my first lever action build in a while, so my mental designing was a bit rusty.
Second, I focused on staying committed to the concept: a tactical lever action build in the style of 3-Gun ARs rather than the specific elements I had in the initial design. The clearest example of this was the change in the optics plan. The initial design called for a Leupold VX-Freedom LPVO with a Sig Romeo1 offset. However, this added weight and bulk and since the LPVO adjusts down to 1.5x there isn't much need for the red dot.
Similarly, I'd planned to add a quiver to the handguard to hold a few spare rounds. Once I confirmed that the extended mag tube could hold 10 rounds, an additional two in a quiver seemed like more weight than function. Removing it also gave me space to show off some more brass.
Last thing before all the pics....
Thanks to Henry for pitching in giving me a steep discount on this Big Boy Model X. As you all know by now, I don't get paid to do these projects. I do them for fun and to inspire others' creativity. Each project costs >$2,000, so I really appreciate it when the manufacturers like Henry sponsor parts of the builds or offer big discounts to help reduce my costs. Thank you Henry USA!


The picture below best shows the fade paint job on the stock. I used my favorite firearm paint, Brownell's Aluma-Hyde in matte black. I like the texture that the Aluma-hyde added and both the front-to-back and back fades actually turned out pretty good. But, I don't love the look. I don't think I'll do a wood-paint fade like this again.

Below's a gallery of the key parts of the build from beginning to end.


Final Build List:
Base Gun: Henry Big Boy X Lever Action
Picatinny Rail: Henry Scope Mount
Scope: Leupold VX-Freedom LPVO
Scope Rings: Aero Ultralight Cantilever
Stock: Henry Natural Wood with some serious modifications
Adjustable Stock Buffer: SPS 2 Adjustable Butt Plate
Cheek Riser: Custom made from brass
Handguard: Custom made from a 2" x 1" carbon fiber tube
Extended Magazine Shell: Custom made from titanium tube
Extended Magazine Inner Tube/Spring: Henry's 10-rounder
Muzzle Brake: Strike X-Comp & Thread Adapter
Accents: Custom formed brass
Thanks as always or following along. My next project is a forward-charging 22LR build. You can see the initial design and all the coming build posts here.