Tactical Forward Charging 10/22: The Build Part V - Final Charging Handles Design
- Feb 12, 2024
- 3 min read
I've spent the last 3 months and the 5 posts working on the charging handles to no avail. I've ruined lots of parts, changed the whole design concept at least 3 times, bought new parts, ruined them, and got very frustrated along the way. However, I've also learned a lot of what doesn't work and am finally locking in on what does.
Below, I'll speed through some of the items that didn't work since Post IV (when I thought I had the design locked) and get you up to speed on how she's working now.
As a reminder, the video below is how I left off in Post IV. I had stacked the liner slides and had independently-moving angle iron handles for both the right and left side, plus a 3rd angle iron that would connect back to the Volquartsen's bolt.
I was really liking how this looked and felt so I started working on it's connection back to the bolt. The first part of the connection was a combination black acetal and brass angle iron anchor where the original charging handle fits.

I carved a small channel in the acetal and bent a 3mm steel rod to fit the grove.
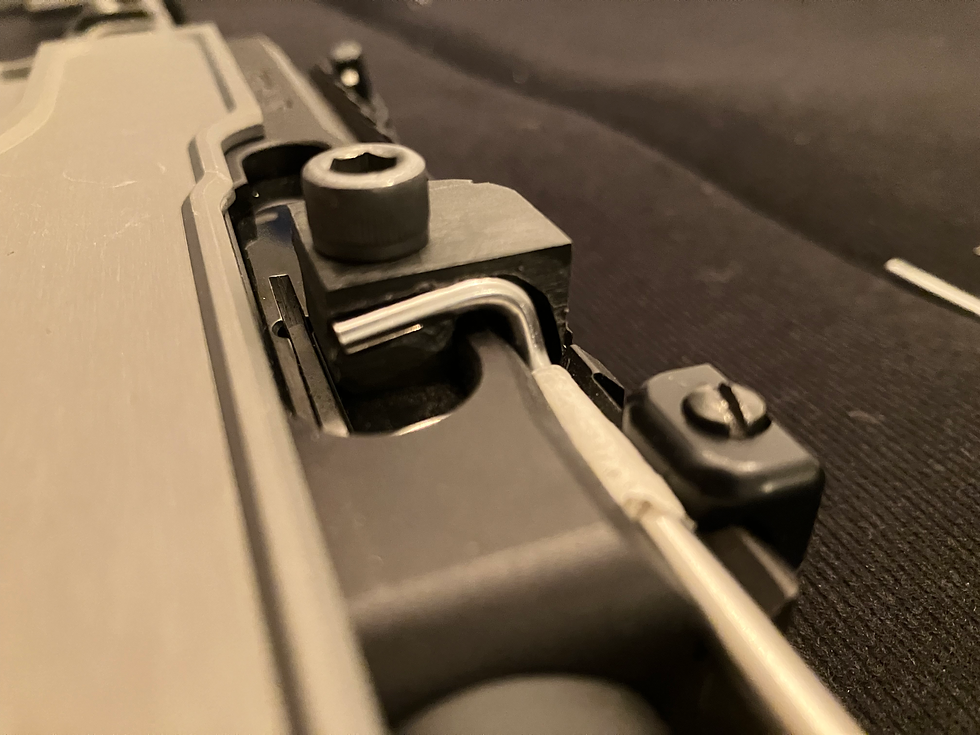
Then added the shaped brass to lock the bent rod in place.

The front of the rod extends along the barrel to the charging handles and is secured at the rear by a 1/2" long piece of steel tube that has an inside dimension of just over 3mm. This small piece of tube (wrapped in masking tape in these images) is pinched in place by the back size of the Surefire Scout Light Mount that holds the brass tube on the other side of the receiver.

All dolled up with the handles and some mother of pearl embellishments, the front was looking pretty nice.

It also didn't work very well. Yes, it would charged the bolt, but it was very sticky. There was too much rotational force from the outside of the handles to the bearings in the linear slides. This was especially true for the left side charging handle. When pulled, it transferred motion to the bearing it was secured to in the bottom slide, then to the rear-most angle iron piece that was connected to the rod extending from the bolt. It was a cool idea, but didn't work. I needed (yet another) plan.
The Final Design
I went back to the drawing board with a simpler idea focused on high durability and reduced rotational pressure on the small slides and bearings. I decided to use only one linear slide, which meant giving up the independent movement of the right and left sides, but also meant less weight and way more strength.
I began by cutting up and drill another piece of aluminum angle iron to be the base of the new setup. You can see in the image below that I am connecting this large piece via 2 of the linear bearings in the same slide.

I chopped it up further to reduce weight.....

And tapped two holes in each vertical piece with a 6x32 drill and tap set. You'll see why later.

For the left side handle, I used a piece of brass angle iron that I drilled to sit on top of the main aluminum piece.

I wanted the charging handles themselves to be much stronger than in the last design, so I tapped the brass with an M6 x 0.75 tap so that I could mount the handles with an M6 x 0.75 bolt. This setup feels WAY better than the previous versions.

I did the same M6 x 0.75 tap on the right side as well, but it's going through both the brass and aluminum on the right. As you can see below, I added two small pieces of the brass angle iron onto the aluminum uprights on the right side. These pieces will connect to the 3mm transfer rod that drives the bolt.

After drilling a few holes for the transfer rod and then cutting off some of the excess metal, the whole setup was in place and working really well. Below are some close up images to see how it all fits together. There's also a video at the end of me triggering the bolt release so you can get a sense of how snappy the whole setup moves with the motion of the bolt.


Enjoy that "TTTCHUNNNKK" sound.


Comments